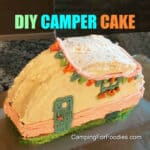
DIY Camper Cake
Servings: 10
Camping For Foodies Dessert Camping Recipes: This adorable cake makes a fun gift for special camping occasions.
Print Recipe
Ingredients
Cake Ingredients
- 1 (15 oz) boxed cake mix prepared according to package directions to make two 8-inch round cakes (usually requires the addition of water, eggs and vegetable oil)
Frosting Ingredients
- 1/2 cup unsalted butter at room temperature
- 4 cups confectioners' sugar
- 1 1/2 teaspoons pure vanilla extract
- 2 tablespoons milk plus more if necessary for thinning
- 4 different colors of food coloring
Instructions
Make The Cakes
- Bake two 8-inch round cakes according to package directions. (If you have a favorite recipe, you can use it rather than a boxed cake as long as it goes well with buttercream frosting.)
- Remove from oven and completely cool on wire racks.
Make The Frosting
- In large bowl, cream butter with electric mixer.
- Gradually beat the confectioners' sugar into the butter until it is fully incorporated. (This will be relatively thick frosting but it needs to be thin enough to pipe through a pastry bag. So, after the first 3 cups of sugar, go slow, you may not need the entire 4th cup).
- Beat in vanilla extract.
- Add milk and beat for few more minutes. (If frosting becomes too thick, add more milk, a little at a time, to reach your desired consistency.)
Color The Frosting
- Separate the frosting for the different colors you choose for your camper's décor.Bowl 1: Spoon 1/2 of the frosting into the first bowl, it will remain white.
- The remaining frosting will be divided into the rest of the bowls to be colored with food coloring.Bowl 2: Spoon 1/2 of the remaining frosting into the second bowl that will be used to color the body of the camper and string for the flags (I used a light pink). Mix frosting with food coloring and spoon into piping bag (use star tip, if desired).
- The remaining frosting will be equally divided into the final three bowls to make the ground, door, windows, flowers, leaves, door knob and flags.Bowl 3: Spoon 1/3 of the remaining frosting into bowl three to color the grass, leaves in flower boxes and some of the flags (I used a light green). Mix frosting with food coloring and spoon into piping bag (use round tip, if desired).Bowl 4: Spoon 1/3 of the remaining frosting into bowl four to color the door, windows, tire and some of the flags (I used a light blue). Mix frosting with food coloring and spoon into piping bag (use round tip, if desired).Bowl 5: Spoon 1/3 of the remaining frosting into bowl five to color the doorknob, flowers in the flower boxes and some of the flags (I used a light orange). Mix frosting with food coloring and spoon into piping bag (use leaf tip, if desired).
Decorate The Cake
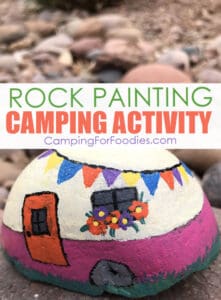
- It is helpful to have a camper drawing or object you can refer to as you decorate. I used my finished Retro Camper Rock Painting Camping Activity as my inspiration for this cake design.
- If the cakes are puffed-up in the center, use a serrated knife to trim them off so they sit flat against each other when they are stacked.
- Place the first cake, bottom side down, on a piece of parchment paper in the center of a large cutting board or sturdy serving tray.
- Frost the sides with a thin crumb coat layer of white frosting. (see Note 1)
- Frost the top of the cake with a generous layer of white frosting that will become the middle layer of the cake.
- Place the second cake, upside down, on top of the first cake. You want the bottom of the second cake facing upwards to give you the flattest surface for frosting.
- Crumb coat frost the sides and top with a thin crumb layer of white frosting.
- Slice off about 1/4 of the layered cake from one side and discard (well, you'll actually eat it as leftovers for the baker LOL). This will create the flat bottom of the trailer when you erect it to stand upright.
- Carefully tip the cake upright so it is standing on its flat side.
- Add a thin crumb layer of frosting to the last side of the cake (formerly the bottom) that is now exposed and will become one side of the camper.
- Now, frost the entire cake with white frosting to cover the crumb coat.
- Using a long sharp knife, gently push the knife into the frosting to form a line around the bottom (about 1/4 up) of the entire camper. This will define a straight line that separates the top and bottom of the trailer for the different colored frosting used to decorate it.
- Using the trailer body color (pink) frosting, pipe straight lines across the camper starting at the defined knife line and working your way down to the bottom of the camper. (Star tip 18)
- Using the door color (blue) frosting, pipe circles to make the tire and outline the door and windows. (Round tip 5)
- Using the grass (green) frosting, pipe the grass and leaves at the bottom of the windows to create the flower boxes. (Round tip 5)
- Using the flower (orange) frosting, pipe small dots in the leaves to create the flowers in the flower boxes. (Round tip 5)
- Using the door color (blue) frosting, pipe lines to fill in the door, leaving the window area open and white frosting exposed. (Round tip 5)
- Using the flower (orange) frosting, pipe a small dot to create the doorknob.
- Use a knife to spread white frosting over any areas (especially the edges on top of the trailer) that have the cake showing through the frosting.
- Using the trailer body color (pink) frosting, pipe a circle around the top of the camper to create the string for the flags.
- Using the green, blue and orange frosting, create triangle shaped flags to hang from the string around the entire camper.
- Pipe more green frosting to fill in the grass.
- Pipe a blue horizontal line across the middle of the windows to create the horizontal frame.
Storage
- Keep cake covered with plastic wrap in the refrigerator until you are ready to deliver it.
Add Sentiments To The Cake
- There are so many camping cakes ideas and sentiments you can add with a hand-written note or something printed from a simple text document. (see Note 2)
Notes
- Crumb Coat Purpose: To frost the cake with a thin layer of icing to prevent the cake from drying out and to "glue down" the crumbs to stop them from spreading into the final frosting layer.
- Cute caravans cakes can be used to celebrate all sorts of special occasions like:
- Retirement cake
- Glamping birthday cake
- RV housewarming cake
- Christmas cake
- Wedding cake
Nutrition Information
Serving: 1g | Calories: 272kcal | Carbohydrates: 48g | Protein: 0.2g | Fat: 9g | Saturated Fat: 6g | Polyunsaturated Fat: 0.4g | Monounsaturated Fat: 2g | Trans Fat: 0.4g | Cholesterol: 25mg | Sodium: 4mg | Potassium: 9mg | Fiber: 0.002g | Sugar: 47g | Vitamin A: 288IU | Calcium: 7mg | Iron: 0.04mg