DIY Portable Water Tank For RV Boondocking Using Gravity Fill Camping Water Container VIDEO
By Pete | My Husband’s Corner
Sometimes you just want to be boondocking longer than your RV fresh water tanks do and that causes issues with cleanliness and camping safety. Our solution was to build a DIY portable water tank for RV boondocking using a gravity fill camping water container.
We love RV tips and hacks that will let you keep on camping! Watch our VIDEO to see how easy it is to build and use!

VIDEO
Note: This video is compatible with Chrome, Firefox and Safari browsers without ad blockers enabled. If you are having trouble viewing this video, please disable any ad blockers and switch to a compatible browser. Thanks!
Hit the “STAY” button in the bottom right corner to watch the entire video. If you want to re-watch it again, just refresh your browser.
Psst we’re compensated…see our disclosures.
Water Containers For Shorter RV Trips
Sometimes the best camping gear is the kind you build yourself!
Refilling Water On Shorter Trips
We have an entire post dedicated to how to refill fresh water tanks during camping trips where we show you 4 different methods so check them out to see which one is best for you. (We actually use all of them, it just depends on our particular camping situation.)
Our 7 gallon jugs
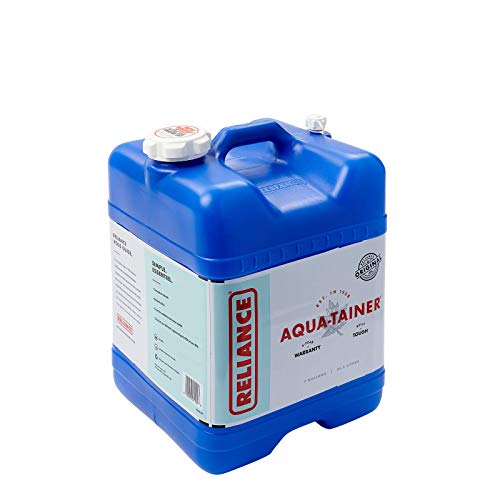

We use 7 gallon tote jugs to refill our RV fresh water tank on shorter trips.
Options For Longer Trips
But, when we are boondocking for longer periods of time, our travel trailer’s permanent water tanks and our smaller camping water containers don’t have enough water storage capacity to meet our needs. That’s when we fill our 35 gallon portable water tank which will give us an extra week or more of dry camping depending on how conservatively we use water.
No Electricity Requirement
Electricity is another item in short supply when boondocking, so we did not want to use power for an electric pump to transfer water from our portable water tank to our installed RV fresh water holding tanks, so we designed our system to work with an RV drinking water hose and using only a gravity fill transfer.
How To Build
You’ll find the printable instructions as you scroll down the page.
Step 1. Get the supplies
Get these 4 following supplies here:
- Plastic Beverage Drum
- Spigot Valve
- Hose Adapter
- Blow Out Plug
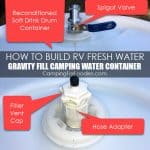
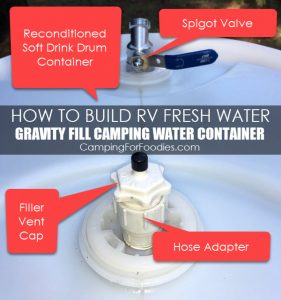
Item #1: Plastic Beverage Drum
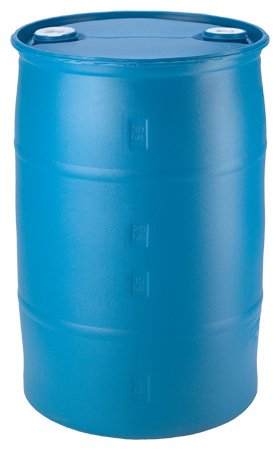
We got our 35 gallon soft drink container from a local soda beverage distributor but you can find them from private sellers as well as on Amazon. The container comes with pre-drilled holes and caps that have the ability to accept accessory fittings.
- We chose a 35 gallon container size because it was more manageable but a 55 gallon drum gives you more capacity and works the same way.
Item #2: Spigot Valve
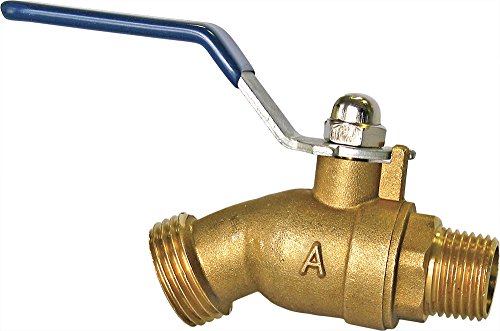
Make sure you get a spigot valve with proper sized fittings. The most common size of fitting is 3/4 inch but verify which size is needed for your specific plastic drum.
Item #3. Hose Adapter

As with the other items in this list, make sure you get a hose adapter with proper sized fittings. The most common size of fitting is 3/4 inch but verify which size is needed for your specific setup.
Item #4. Blow Out Plug

You need a blow out plug but it won’t actually be used for its designed purpose, you will be using it as a filler vent cap.
Step 2. Gather tools
Gather tool needed: Screwdriver
Step 3. Punch out both barrel caps
Using the screwdriver, punch out the center portion of the 3/4-inch threaded part of both barrel caps. (This is where your spigot valve and hose adapter will thread into.)
Step 4. Attach valve, adapter and plug/vent cap to drum
- Thread the spigot valve into the threaded barrel cap that is closest to the container rim.
- Screw the hose adapter into the threaded barrel cap that is furthest from the container rim.
- Screw the blow out plug/filler vent cap into the hose adapter. (Note: This becomes the filler port for using a drinking water hose to fill the portable water tank. IMPORTANT: If you use this method for filling, make sure you open the spigot valve to provide proper venting to avoid rupturing the tank.)

How To Fill With Water
Use a drinking water hose to fill your portable camping water container by one of two methods:
- Remove the blow out plug cap/filler vent cap from the hose adapter, then thread the hose to it and fill the container. IMPORTANT: If you use this method for filling, make sure you open the spigot valve to provide proper venting to avoid rupturing the tank.
- Completely remove either cap and simply fill the container through the opening.
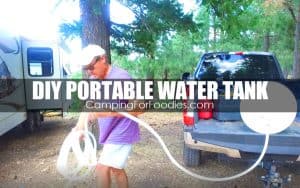
How To Transfer From Portable To RV Fresh Water Tank
- Ensure the portable RV camping water container is higher than the RV fresh water filler port, otherwise the gravity fill won’t work.
- Lay the portable RV camping water container on its side with the spigot valve facing down.
- Thread the drinking water hose to the spigot valve.
- Place the other end of the drinking water hose in the RV fresh water filler port opening.
- Open the spigot valve and loosen the cap on the vent/filler port as necessary to vent the tank as it gravity feeds into your RV fresh water tank.
- The RV fresh water tank will overflow when it is full. At that time, close the spigot valve, remove the hose from the RV fresh water filler port opening and the portable RV camping water container, then, replace the cap on the travel trailer’s fresh water filler port.
Printable Instructions
DIY Portable Water Tank For Gravity Filling Onboard RV Fresh Water Tank
Equipment
- 1 Screwdriver
- 1 RV fresh water hose
Materials
Instructions
Build the tank
- Gather equipment and materials. Make sure the fitting sizes are compatible with each other and your water hose.
- Using the screwdriver, punch out the center portion of the 3/4-inch threaded part of both barrel caps. (This is where your spigot valve and hose adapter will thread into.)
- Thread the spigot valve into the threaded barrel cap that is closest to the container rim.
- Screw the hose adapter into the threaded barrel cap that is furthest from the container rim.
- Screw the blow out plug/filler vent cap into the hose adapter. (Note: This becomes the filler port for using a drinking water hose to fill the portable water tank. IMPORTANT: If you use this method for filling, make sure you open the spigot valve to provide proper venting to avoid rupturing the tank.)
Fill tank with water
- Use a drinking water hose to fill your portable camping water container by one of two methods:
- Method #1: Remove the blow out plug cap/filler vent cap from the hose adapter, then thread the hose to it and fill the container. IMPORTANT: If you use this method for filling, make sure you open the spigot valve to provide proper venting to avoid rupturing the tank.
- Method #2: Completely remove either cap and simply fill the container through the opening.
Transfer From Portable To RV Fresh Water Tank
- Ensure the portable RV camping water container is higher than the RV fresh water filler port, otherwise the gravity fill won’t work.
- Lay the portable RV camping water container on its side with the spigot valve facing down.
- Thread the drinking water hose to the spigot valve.
- Place the other end of the drinking water hose in the RV fresh water filler port opening.
- Open the spigot valve and loosen the cap on the vent/filler port as necessary to vent the tank as it gravity feeds into your RV fresh water tank.
- The RV fresh water tank will overflow when it is full. At that time, close the spigot valve, remove the hose from the RV fresh water filler port opening and the portable RV camping water container, then, replace the cap on the travel trailer’s fresh water filler port.
Video
Inflatable Bladders
If you don’t have room to carry a big barrel or lots of jugs, you may want to consider a water bladder than can be folded and easily packed for storage and transportation. Watch our YouTube video: Ditch the Water Woes – We Found a DAILY SHOWER Solution for BOONDOCKING!
Where To Get Water When Boondocking
As we mentioned in the video, we fill our 35 gallon portable camping water container at home and transport it to our boondocking site. But, if we are camping for an especially long extended period of time, we leave our travel trailer set in place and drive to an RV park, campground or gas station that provides services for dumping of waste and refilling of drinking water. Then, we head back to our remote campsite with an empty portable waste tank and filled portable water containers.
When it comes to boondocking, the gray water and black water tanks cause other issues. We use RV portable waste holding tank accessories which we will discuss in detail in another post.
As we mentioned in the video, here is the link to our Portable Solar Panels For RV Camping VIDEO and blog post. We use our portable camping water container when we are boondocking (which is about 99% of the time for us LOL).
Learn more about it in our Boondocking: How And Where To Go Dispersed Camping post.

FREE Camping Trip Planner
Make your next trip stress-free with a little pre-planning. Get your copy of our FREE printable camping trip planner template!

What do you think?
Leave me a comment, question or suggestion below. I’d love to hear from you so let’s chat.