How To Refill Fresh Water Tank During Camping Trips: Tips For Getting Water While Dry Camping
Most campers need a few RV tips and hacks when it comes to camping without hookups.
Water is essential for cleaning, cooking and drinking during your outdoor adventures. So, it becomes a bit of a challenge when there’s no city water supply in sight. Do you know how to refill fresh water tank during camping trips? If not, you will soon!
This comprehensive post will teach you all you need to know on the subject:
- 4 ways to refill your fresh water tank
- Different types of RV’s and their connections
- Step-by-step instructions for each type of connection
- Where to get fresh water and typical rates you should expect to pay
- Different styles of mobile water containers
- Safety tips for you and your equipment
- How to conserve water when camping without hookups
- Cleanliness and sanitizing your RV water system
Psst we’re compensated…see our disclosures.
Water Hookups vs Stored Water
There are two ways to use water from your RV, this post is only about using and refilling your stored water:
- Water Hookups. Hook up to city water and let the city water pressure move water through your RV’s plumbing lines (this is good when you have a campsite with a water hookup). You will connect a freshwater hose to the “City Water” port on your RV. When hooked up this way, you keep your water pump turned off. It is the pressure in the city water system that will make the water flow through your RV’s water system. It is a good idea to use a water pressure regulator when you are hooked up to city water because the last thing you want to do is damage your plumbing system if the city water pressure is too high.
- Stored Water. Fill your RV’s fresh water tank and pump the water out of that tank and through your RV’s plumbing lines (this is good when you have a campsite without a water hookup or you are boondocking in the middle of nowhere). That’s why you call it dry camping … camping without a water hookup. When adding water into your RV, you will use the fresh water port on your RV. To use water that is stored in your fresh water tank, you must turn on your 12-volt DC water pump to pressurize the lines. This requires power but it is minimal … the pump can operate by having your rig plugged in (to shore power or a generator) or it can operate off of your RV battery.
Whether you are using water directly from the city water supply or pumping out of your RV’s fresh water tank, the water flows to the same outlets…
- Kitchen sink faucet
- Bathroom sink faucet
- Bathroom shower head
- Bathroom flushing toilet
- Exterior water faucets like outdoor showers, outdoor kitchen faucets etc.
Knowing Your Specific RV’s System
You may be boondocking in the wilderness or camped in a campground that doesn’t have water hookups at the campsites … either situation will limit how long you can camp with the water you have in your fresh water holding tank.
Before you learn how to fill RV water tanks with freshwater, you need to know about YOUR SPECIFIC SYSTEM and the TYPE OF CONNECTIONS you have because the REFILLING PROCESS IS DIFFERENT for different types of RVs.
3 Types Of Recreational Vehicle Water Tanks & Their Capacities
CAUTION: Don’t overflow your waste tanks!!!
There are three different types of tanks in RVs that have important specifications you need to know: fresh water tank capacity vs gray water tank vs black tank waste capacities.
For people who do a lot of boondocking, the capacity of fresh RV water tanks is important and can be a critical consideration when buying an RV. The more capacity you have, the longer you can dry camp in remote locations between fill-up events.
Personally, we don’t drink or cook with water that runs through our RV plumbing system (whether hooked up to city water or running off of our fresh water tank). We use 1 gallon drinking water jugs for that. We use water that passes through our RV water system for washing dishes, hand washing in the indoor and outdoor sinks, showers and flushing the toilet.
If you start your trip with a full fresh water tank and decide to refill it during a dry camping trip, you have to be cautious of how many gallons of fresh water you add because that extra water has to go somewhere when you are done with it.
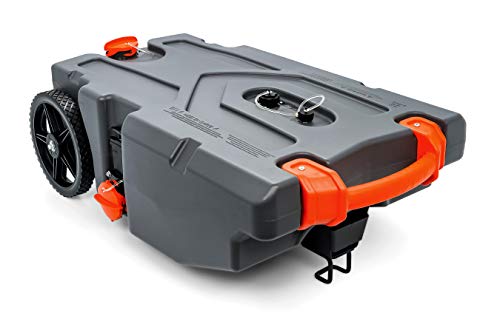
You don’t want to overflow your waste tanks! We use a portable waste RV tote tank to hold our waste until we can get to a dump location. They come in all sorts of sizes and have wheel kits so you can easily manage them when they are full.
Heavy Duty 36 Gallon Portable Waste RV Tote Tank
THEORY: Most RVs should be designed so that the fresh water tank holds about 10% less water than the grey water tank (which is where the sinks and shower waste water is held) to avoid the problem of overflowing the grey waste tank. The black water tank (solid waste) has the lowest capacity and holds liquid and solid waste (pee and poop), toilet paper and water from flushing the toilet. That’s a logical theory, right?
FACT: RVs have different ratios of tank capacities … some actually have TWO TIMES MORE FRESH TANK CAPACITY THAN GRAY TANK CAPACITY making it LIKELY TO OVERFLOW THE GRAY TANK if you are not careful … so you need to be aware of your specific tank sizes in your particular type of RV.
Some smaller campers don’t have a gray tank, at all. They only have fresh and black tanks which means the black tank holds the waste from the sinks, shower and toilet.
Some examples of RV holding tanks specifications.
Forest River – Flagstaff High Wall HW29SC Popup Camper
- Fresh: 20 fresh gallons of water
- Gray: 12 gallons of gray waste
- Black: 12 gallons of black waste
Keystone Cougar Half-Ton 22RBS Travel Trailer
- Fresh: 60 fresh gallons of water
- Gray: 30 gallons of gray waste
- Black: 30 gallons of black waste
Alliance RV 310RL Paradigm 5th Wheel
- Fresh: 98 fresh gallons of water
- Gray: 106 gallons of gray waste
- Black: 53 gallons of black waste
Coachmen Leprechaun Premier 298KB – FORD 450 C-Class
- Fresh: 48 fresh gallons of water
- Gray: 34 gallons of gray waste
- Black: 31 gallons of black waste
Coachmen 22RB Ford Transit 350 HD Class B Motorhome
- Fresh: 28 fresh gallons of water
- Gray: 15 gallons of gray waste
- Black: 16 gallons of black waste
Tiffin Allegro Breeze A-Class Motorhome
- Fresh: 70 fresh gallons of water
- Gray: 55 gallons of gray waste
- Black: 33 gallons of black waste
Identifying Potable Water Sources
Only fill your RV water tank with water that is clean and safe. Even if you don’t drink the water, you still want to make sure it is potable because you’ll be using it to wash your body and your dishes.

Most campgrounds will have their water sources clearly labeled stating that they are safe to drink or unsafe to drink. You should look for signs that state something like the following:
- Potable Water Safe To Drink
- Non-Potable Water Do Not Drink
Water filters that can be attached to a fresh water drinking hose are usually designed to remove minerals and metals … NOT chemicals, bacteria, viruses, spores and parasites. You should never assume you can use a water filter to make non-potable water safe to drink. When in doubt, that water should only be used for flushing your black tank and sewer hose.
If you see a garden hose at a campsite water filling station, you should never use it to fill your fresh water RV tank or portable jugs.
The color of the water spigot may also be an indicator of its cleanliness. Typically, red spigots indicate the water is non-potable while green or blue paint designates the water is potable. BUT, you should always verify the condition of the water if the source is not clearly marked as potable water.
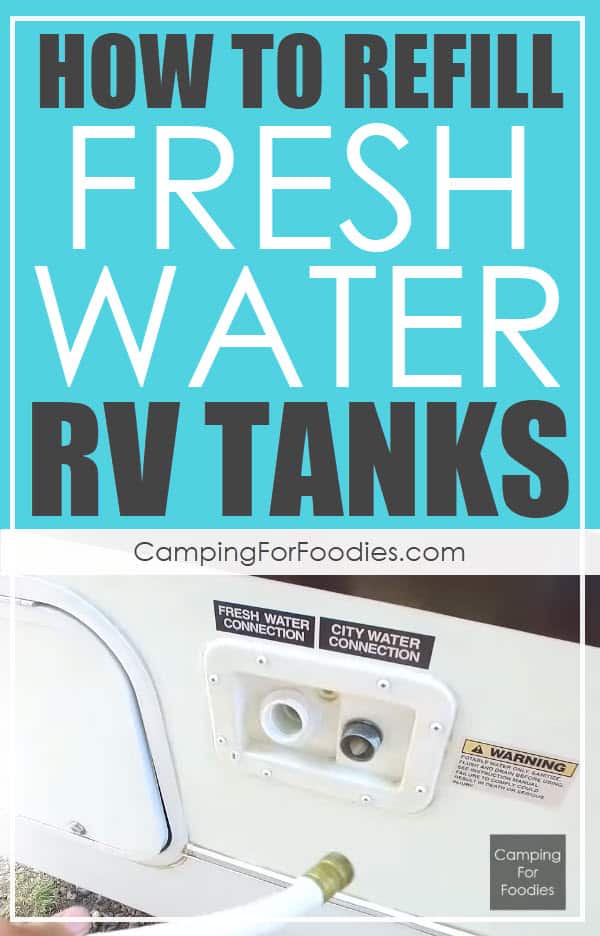
1 & 2 Port Fresh Water Systems
Two Port Systems. Most RVs have two separate connections: one for connecting to city water for immediate use and another intake valve for filling your fresh water holding tank for later use.
One Port Systems. Some campers and smaller travel trailers only have one fresh water inlet that has a valve with a lever you turn to direct the water into the plumbing lines for immediate use or divert it into the fresh water holding tank for storage and later use.
Threaded & Non-Threaded Connection Styles
There are 2 types of connections for getting water into RVs: threaded and non-threaded.
- Threaded ports allow you to thread on a drinking water hose and pressure-feed water into your RV.
- Non-threaded filler ports allow you to pour water directly into your RV.

Connection Style Combinations For Different RVs
Some RVs have a threaded port and a non-threaded port.
- The threaded port is used to pressure-feed water into the RV’s plumbing system for immediate use (faucets and toilets) using pressurized city water.
- The non-threaded port is used to pour water into the fresh water tank for storage and later use.
Some RVs have two threaded ports.
- The first threaded port is used to pressure-feed water into the RV’s plumbing system for immediate use (faucets and toilets) using pressurized city water.
- The second threaded port is used to pressure-feed water directly into the fresh water tank for storage and later use.
Some RVs have one threaded port.
- The threaded port is used to pressure-feed water into the RV’s plumbing system for immediate use (faucets and toilets) or into the fresh water tank for storage and later use. This will depend on the valve position you have selected (either “city” or “fill” valve position).
4 Ways To Fill Your RV’s Freshwater Tank
Each process is slightly different depending on the type of connection your RV has … so scroll down to find the process that matches your RV’s connection style for the method you want to use.
There are 4 methods to fill your RV’s fresh water STORAGE tank, two by pressure and two by gravity:
- Pressure fill
- Pressure from a city water source
- Pressure from a pump
- Gravity fill
- Gravity pour
- Siphon transfer
Method #1: Pressure Fill By City Water Source
Use this process for Threaded City Water Source Pressure Filling if you have a threaded style connection on your RV fresh water storage tank:
- Connect your fresh water hose to a regular potable water spigot that has enough pressure to feed clean water into your fresh water RV tank.
- Remove the cap from your RV’s water storage tank filler port. The inlet will be clearly labeled. It will say something like: “Fresh Water Fill”.
- Connect one end of the hose to the city water spigot.
- Connect the other end of the hose to your RV’s water inlet port (this will be a threaded fill port).
- If your RV is the type that has only one inlet with a valve, turn your valve to “tank fill” to direct the water into your fresh water holding tank.
- Slowly turn on the water spigot’s valve and wait for the tank to fill. You can check the progress by looking at the tank sensor indicator light on the panel inside your RV.
- When the tank is full, water will begin to flow outside your RV from the overflow vent port. That port is usually located next to the fresh water filler port.
- Turn off the spigot.
- Disconnect the hose from the spigot and the RV.
- Replace the cap on your RV’s water storage tank inlet port.
- Store your hose in a clean area.
- Turn on your RV’s water pump to pressurize the system. If your RV is the type that has only one inlet with a valve, turn your valve back to the original closed position before turning on your water pump.
Use this process for Non-Threaded City Water Source Pressure Filling if you have a non-threaded style connection on your RV fresh water storage tank:
- Connect your fresh water hose to a regular potable water spigot that has enough pressure to feed clean water into your fresh water RV tank.
- Remove the cap from your RV’s water storage tank filler port. The inlet will be clearly labeled. It will say something like: “Fresh Water Fill”.
- Connect one end of the hose to the city water spigot.
- Insert the other end of the hose to your RV’s water inlet port (this will be a non-threaded fill port).
- Slowly turn on the water spigot’s valve and wait for the tank to fill. You can check the progress by looking at the tank sensor indicator light on the panel inside your RV.
- When the tank is full, water will begin to flow outside your RV from the overflow vent port. That port is usually located next to the fresh water filler port.
- Turn off the spigot.
- Disconnect the hose from the spigot and remove the other end from the RV’s filler port.
- Replace the cap on your RV’s water storage tank inlet port.
- Store your hose in a clean area.
- Turn on your RV’s water pump to pressurize the system.
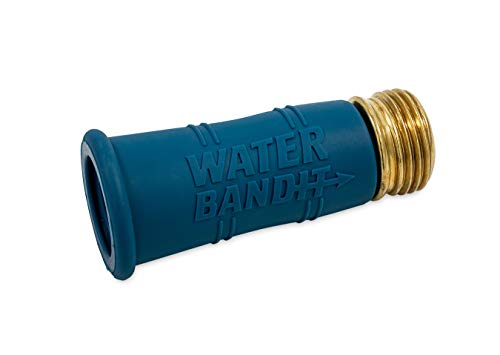
Connecting To A Stripped Water Spigot
If you encounter a stripped or thread-less water spigot, the best way to proceed with a pressurized filling using the city water is to have an adapter. The only thing we have seen that works is a little gadget called a Water Bandit.
It allows you to connect a hose to standard sized faucets that are without threads or have stripped threads.
The brass end connects to your drinking water hose. The other end is a flexible, stretchable sleeve that fits over standard water spigots.
Method #2: Pressure Fill By Pumping
If you are set-up in a camping location and you don’t want to move your RV to get more fresh water into your onboard tank, you will need to bring filled water jugs to your campsite and then transfer the water into your RV’s fresh water holding tank. There are several options to transfer out of the water bottles and into your RV tank using different types of pumps.
Use this process for Threaded Pressure Pump Filling if you have a threaded style connection on your RV fresh water storage tank:
- Gather two short drinking water hoses with the proper male & female connections. Use the shortest hose possible to make this process simple.
- The first step is to remove the cap from your RV’s water storage tank filler port. The inlet will be clearly labeled. It will say something like: “Fresh Water Fill”.
- Connect one hose to the RV’s water storage tank inlet port (this will be a threaded fill port).
- Connect the other end of that hose to the outlet side of the pump.
- If your RV is the type that has only one inlet with a valve, turn your valve to “tank fill” to direct the water into your fresh water holding tank.
- The next step is to connect the second hose to the supply/inlet side of the pump.
- Submerge the other end of that hose into the filled portable water jug.
- Start the pump to transfer the water from the portable jug to your RV’s fresh water tank. Use as many jugs as necessary to fill the tank.
- When the tank is full, water will begin to flow outside your RV from the overflow vent port. That port is usually located next to the fresh water filler port.
- Stop the pump and disconnect the hoses.
- Replace the cap on your RV’s water storage tank inlet port.
- Store your hoses and pump in a clean area.
- Turn on your RV’s water pump to pressurize the system. If your RV is the type that has only one inlet with a valve, turn your valve back to the original closed position before turning on your water pump.
Use this process for Non-Threaded Pressure Pump Filling if you have a non-threaded style connection on your RV fresh water storage tank:
- Gather two short drinking water hoses with the proper male & female connections. Use the shortest hose possible to make this process simple.
- The first step is to remove the cap from your RV’s water storage tank filler port. The inlet will be clearly labeled. It will say something like: “Fresh Water Fill”.
- Insert one end of the hose to the RV’s water storage tank inlet port (this will be a non-threaded fill port).
- Connect the other end of that hose to the outlet side of the pump.
- The next step is to connect the second hose to the supply/inlet side of the pump.
- Submerge the other end of that hose into the filled portable water jug.
- Start the pump to transfer the water from the portable jug to your RV’s fresh water tank. Use as many jugs as necessary to fill the tank.
- When the tank is full, water will begin to flow outside your RV from the overflow vent port. That port is usually located next to the fresh water filler port.
- Stop the pump and disconnect the hoses.
- Replace the cap on your RV’s water storage tank inlet port.
- Store your hoses and pump in a clean area.
- Turn on your RV’s water pump to pressurize the system.
Types Of Pumps
Many RVers uses these two types of pumps but they are not designed specifically for transferring potable water and they may contain oil or other contaminants that are unsafe for this purpose so do your own research to determine if you are comfortable using these types of pumps.
The benefit of using a drill pump is that the drill is battery operated, but the drawback is that many of these pumps overheat so if you don’t want to burn up your drill, you may need to do small amounts of water at a time, giving the drill time to cool between uses.
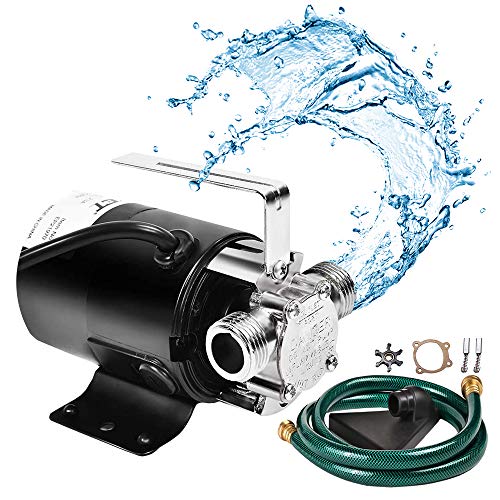
The benefit of using an electric pump is the durability of the pump, but the drawback is that these require electricity … either being plugged in to a 110 volt outlet (with GFI protection) or a battery using alligator clips.
Water Transfer Pump, Portable Electric Utility Pump
The benefit of using a manual hand/crank pump is that no electricity is required, but the drawback is that you physically have to operate the pump yourself.
Method #3: Gravity Fill By Pouring
If you ever wondered how to fill RV water tanks without a hose … here’s your answer.
Just like the pump method, the gravity fill method requires you to bring filled jugs of water to your camper and transfer it to your RV’s fresh water holding tank.
The first thing you should know is that when you are transferring water using gravity rather than pressure … you need to have your water source located higher than your fresh water port fill hole.
That is the most challenging part of this method because water is heavy, over 8 pounds per gallon!
If you use small mobile water containers, they are easy to lift but you’ll need a lot of them to provide a significant amount of water.
Use this process for Non-Threaded Gravity Filling if you have a non-threaded style connection on your RV fresh water storage tank:
- Remove the cap from your RV’s water storage tank filler port. The inlet will be clearly labeled. It will say something like: “Fresh Water Fill”.
- Place a funnel in your RV’s water inlet port (this will be a non-threaded fill port).
- Lift a jug of water and slowly pour it into your onboard holding tank through the funnel. Use as many jugs as possible to fill your tank.
- When the tank is full, water will begin to flow outside your RV from the overflow vent port. That port is usually located next to the fresh water filler port.
- Remove the funnel and store in a clean area.
- Replace the cap on your RV’s water storage tank inlet port.
- Turn on your RV’s water pump to pressurize the system.
This is our preferred method of refilling our tank when we are boondocking. We have an entire post with a VIDEO that explains how we use this method and our DIY hack to transfer water from a 35 gallon portable water tank into our RV without electricity.
DIY Portable Water Tank For RV Boondocking Using Gravity Fill Camping Water Container

Use this process for Threaded Gravity Filling if you have a threaded style connection on your RV fresh water storage tank:
Threaded style connections are designed to fill RV fresh water tanks through a pressurized city water connection.
As a general rule of thumb, here’s how to gravity fill a fresh water storage tank on an RV without a gravity filler port. (You should consult your owner’s manual for your specific installation and proper operation technique.)
RV Without Gravity Filler Port
Some RVs have a fresh water tank fill that requires filling your fresh water holding tank using pressure from a city water source we outlined in #1. Those inlets have an inline filter and port that won’t allow you to just pour water into your port.
If you want to use the gravity fill method but your RV doesn’t have a gravity filler port (maybe it has a screen) … you can work around that.
If your RV is designed that way, most manufacturers recommend you remove the bug screen filter from the fresh water tank vent hole … then insert a funnel to pour water into your tank (via the vent hole) … making sure your water selector is on “tank” not on “city”. You can find many RV forums that discuss no gravity fill port issues.
Method #4: Gravity Fill By Siphoning
Just like the gravity method, the siphon fill method requires you to bring filled jugs of water to your camper and transfer it to your RV’s fresh water holding tank.
When siphoning, you still need to have your water source located higher than your filler port.
But, you don’t have to hold and tip the jug to continue the water transfer.
Instead, you use a hose to move the water from the jug to your tank without a pump.
Use this process for Non-Threaded Siphon Filling if you have a non-threaded style connection on your RV fresh water storage tank:
- Remove the cap from your RV’s water storage tank filler port. The inlet will be clearly labeled. It will say something like: “Fresh Water Fill”.
- Set your filled water jug on a flat surface that is higher than your RV’s water inlet port (this will be a non-threaded fill port).
- Submerge one end of your drinking water hose into the bottom of the filled water jug, ensuring that it remains at the bottom.
- Start the siphon with the other end of the hose (see tips below).
- When the water starts flowing through the hose, place it into your RV’s water filler port and hold it there until all of the water has been transferred. Repeat the process using as many jugs as necessary to fill your RV fresh water tank.
- When the tank is full, water will begin to flow outside your RV from the overflow vent port. That port is usually located next to the fresh water filler port.
- Remove the hose and store it in a clean area.
- Replace the cap on your RV’s water storage tank inlet port.
- Turn on your RV’s water pump to pressurize the system.
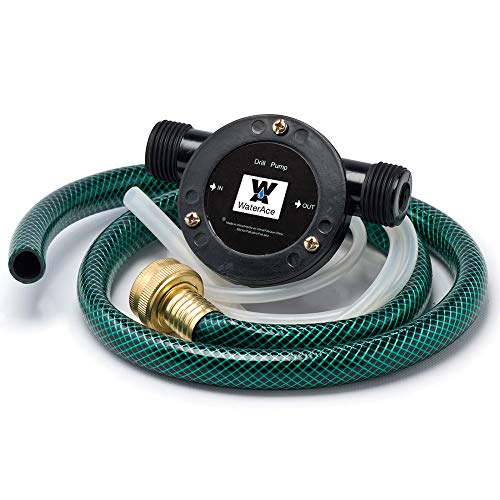
How To Start Water Flow To Siphon Without Sucking On The Hose
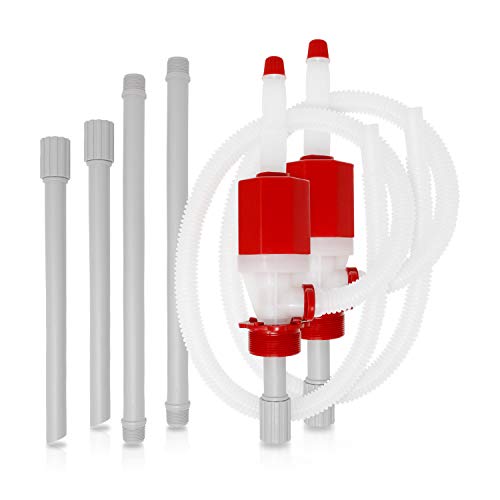
Water siphoning tips: Some people suck on the end of the hose to get the water flowing. If that method does not appeal to you, there are other options. There are manual hand pumps that will start the siphon for you. You just need to do about 6-10 strokes of this hand pump to start the siphoning process.
Hand Transfer Pump For Drinking Water With Fast Siphon
Use this process for Threaded Siphon Filling if you have a threaded style connection on your RV fresh water storage tank:
See the RV Without Gravity Filler Port in the section above.
Mobile Water Containers
When you are hauling water to your RV, there are different styles of portable water containers you can choose from.
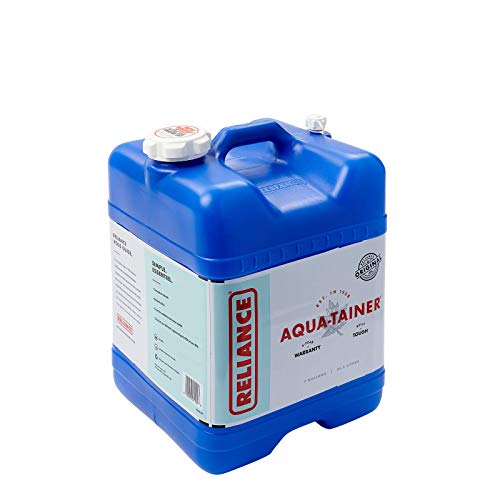
Rigid water containers are the easiest way to transport water to campsites without having to handle them so delicately. Although they are strong and rugged, they are rather large and take up a lot of space whether they are full or empty.
7 Gallon Rigid Water Container
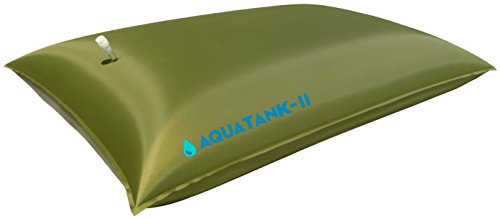
Water bladders are a great way to transport a significant amount of water and they can be folded up and easily stored when they are empty … but … they need a large flat surface, like a bed of a pickup truck, for transporting when they are filled.
30 Gallon Water Storage Tank Bladder Bag
Collapsible water containers are manageable in size and fold flat for storage when they are empty. This is the most convenient size to handle, transport and store. This is one of the most durable collapsible water containers but compared to rigid containers and bladder bags, the collapsible styles are the least rugged so handle them as carefully as possible
5 Gallon Collapsible Water Container

Water Filling Rates
Somebody has to pay for the water! When you are staying at a campground with a fresh water tap (whether you are in a spot with a direct hookup or you need to stop at a water fill station), your campsite fee usually includes this amenity.
Anytime you are getting fresh water, you should expect to pay for it. Whether filling your RV directly or filling mobile/portable jugs you are using to transport the water to your RV in a different location.
If you are not staying at a campground, you can often pay a small fee to fill with their water (and dump too) as a transient RVer.
We recently paid a flat fee of $8 to fill our fresh water tank and jugs that capped our supply at 100 gallons.
You can also find self-serve refill stations that typically average about $0.35/gallon.
Where To Get Water For Your RV Fresh Water Tank
Your RV lifestyle has a big impact on where you will find water. If you are dry camping in a campground that has facilities, you can usually fill up with fresh water and dump at the designated RV dump station. But, finding a fresh water source when you are boondocking may be more difficult than you think. Wherever you are getting your water, make sure it is POTABLE water and verify it is safe to drink. Here are the most common places, some public and private options, you may want to try:
City Parks. Some city parks have potable water available to the public. We never came across this scenario until we camped at Goose Island Campground in Moab Utah. The dry camping facility is operated by the Bureau of Land Management. Posted signs at the campground inform campers to use the local Lions Park, which is a public park about 1.5 miles down the road, to fill up their jugs with the drinking water available from the spigot in the park.
State Parks. Many state parks have campgrounds and dump stations. Even if you are not camping there, you can usually pay for a day pass and use the station to dump waste tanks and fill fresh water tanks and jugs.
National Parks. Many National Parks have water spigots at visitor centers. If you paid to get in to the park (day pass, annual pass or other type of pass) you can usually fill up water jugs even if you are not camping inside the park. We met a guy who was filling up his water jugs at the Arches National Park Visitor’s Center. He told us that his Lifetime Senior Pass pays for itself because of the water he gets at the parks while he is boondocking in the area for free.
Bureau of Land Management (BLM) and National Forest Service (NFS) field offices. BLM and NFS field office locations are filled with information, maps, permits and often have city water spigots available for campers who have their own water bottles to fill.
Rest Stops. Many public rest stops have drinking water available to the public.
RV-Friendly Businesses. Lots of businesses entice RV customers with perks to get them to the property and then spend money while they are there. Casinos, Wal-Marts, Cabela’s and Cracker Barrel restaurants are just a few of the common names you will hear when RVers are talking about free overnight parking, filling up with water and even dumping waste tanks. Each location is different so it is important to call ahead to get the details.
Highway Travel Centers And Gas Stations. The bigger the station, the more likely it is to offer services for big rigs and RVs. Fresh water, overnight parking and dumping are available at many facilities.
Private RV Parks, Campgrounds & Storage Facilities. If you are renting space in these facilities, you will have access to their amenities but you may also have access to use their fresh water and dump facilities as a transient user.
Self-Serve Water Filling Stations. There are companies, like Primo Water, that have self-serve refill water machines at over 25,000 retailers in the U.S. and Canada. You can use their website to find water refill near you by entering your city, state or zip code.
Full Tanks When Traveling
My advice to new RVers is to avoid boondocking and stay in campgrounds until they get some experience under their belts. How to pack food, clothing, gear and water are important RV camping tips for beginners.
The best option for new RV owners is to camp with full hookups. But, I recommend calling ahead to the campground or RV park to ensure the city supply is available and safe (you don’t want to find out about boil water alerts or broken water main issues after you arrive). You should always travel with enough water to get you through emergency situations.
But, you don’t want to carry extra water if you don’t need it. A gallon of water weighs over 8 pounds … you can do the math to figure out how much extra weight you will be carrying as you travel.
The heavier the vehicle, the more challenging the traveling especially if you are driving through mountain passes with steep grades. Heavier vehicles accelerate and decelerate more slowly.
As weight increases, so does the wear and tear on your vehicles. You’ll also see less efficiency in your gas mileage as your vehicle weight increases.
Protecting Your Water Heater And Water Pump
Your water heater and water pump are designed to work when there is water in the system. If you let your fresh and hot water tanks run dry, be sure to turn your water heater and water pump off so you don’t damage them before refilling the water level.
Conserving Water While Dry Camping
The key to refilling your fresh water tank less often is to make it last as long as possible … in other words, don’t waste it.
Here are a few tips on conserving so you only use as much water as is absolutely necessary while you are dry camping.
Reduce showers. Take shorter showers and less of them. Do you really need to shower every day? Turn water off when lathering, turn it on only to rinse.
Reduce dish washing. Try doing dishes once a day or every other day. Use disposable plates, cups and eating utensils, there are biodegradable options if you want to be eco-friendly. Pre-clean dishes by wiping them with a paper towel to remove remaining food.
Quick Rinse. Don’t let the water run while you are lathering your hands and brushing your teeth. A quick rinse is all you need.
Keeping Your Potable Water Hose Clean
Protect your white drinking water hose from contamination. Use it only for connecting to your RV’s fresh water systems.
When you are finished using your fresh water hose, drain it fully then coil it up and screw the ends together to create a “closed system” for storage in a clean location.
Sanitizing RV Freshwater Systems
You should sanitize your entire system including the water lines and tanks on a regular basis.
Most people use household bleach to prevent bacteria growth.
Some people think the stronger the bleach water the better but you have to be careful not to use too strong of a solution because it might cause damage to your system.
A widely accepted recipe is using a mixture of 1/4 cup of bleach for every 16 gallons of water in your freshwater tank but be sure to check your owner’s manual for specifics on how to sanitize RV water tanks for your particular rig.
FREE Printable Trip Planner
You should always prepare for water usage on your trips. Our detailed trip planner will help you with every stage of your adventures.
Make your next trip stress-free with a little pre-planning. Get your copy of our FREE printable camping trip planner template!

Fresh Water For Food Prep & Cleaning
Now that you’ll have plenty of water to clean your dishes on your next trip, maybe you should try some easy and delicious recipes too!
If you’re looking for awesome ideas for yummy camping food, you’re in the right place! Here’s our entire camping recipes list.
There are four methods to refill your fresh water tank that you can try when it is empty: pump refilling, faucet refilling, gravity filling, or pressure filling.
Hi Bruno! Thanks for sharing! Happy Camping, Kim